The 2 3 Rule for Hanging Pictures
Are you looking for an aesthetically pleasing way to hang pictures? Look no further than the ‘2 3 Rule’! This four-step process will help you achieve balance and complete your room.
- Measure the wall space
- Divide the height into thirds
- Determine the midpoint of the wall’s width
- Place the artwork with its center at that point
Remember to keep in mind two key aspects when following the 2 3 Rule. First, avoid hanging pictures too high or low so they don’t get lost. Second, pick pieces that are in proportion to your room – larger for expansive walls, and smaller for tiny rooms.

Make your room come alive with art that has been hung perfectly! Follow our four-step guide and get ready to make an immediate impression.
Understanding the 2 3 Rule
To understand the 2 3 rule for hanging pictures with precision, you’ll need to master two sub-sections. The first: benefits of using the 2 3 rule, explores how it helps you present photos in an appealing manner. The second: how to apply the 2 3 rule, focuses on the practical techniques to get it right.
Benefits of Using the 2 3 Rule
Harness the Power of the 2 3 Rule!
It’s a popular strategy that’ll help you be more productive. Just limit yourself to two main tasks a day and three small ones.
Reducing brain strain and increasing focus has amazing rewards:
- Prioritizing tasks is easier
- You’ll get higher quality results
- Less stress
- More motivation to finish tasks
- Better work-life balance
Adopt the 2 3 Rule and achieve a more satisfying life. You can find other productivity strategies online, but choose the one that works best for you.
Did you know multitasking reduces productivity by 40%? Forbes says it “reduces IQ, shrinks gray matter and impairs short-term memory.” Using the 2 3 Rule is easy, but if you’re bad at math, get a calculator!
How to Apply the 2 3 Rule
The 2 3 Rule is a great way to optimize your workflow. Here’s how to use it:
- Divide Time: Spend two-thirds of your time on the task at hand. Reserve one-third for unexpected tasks or emergencies.
- Prioritize: Assign priority levels to each task. Allocate time accordingly.
- Delegate: Delegate low-priority tasks when you can. Focus on more important matters.
- Review Progress: Check in to see if you are sticking to the rule. Make changes as needed.
Planning is important. Analyzing data like past performance, task complexity and team behavior will help you decide how much time to allocate for unexpected tasks.
Pro Tip: Remain adaptable and nimble when following the rule. It gives structure, not rigidity. Make sure your pictures are at the right height!
Choosing the Right Height for Hanging Pictures
To choose the right height for your pictures, you need to weigh up a few factors. In order to help you with this, we’ve prepared this section – “Choosing the Right Height for Hanging Pictures” with its sub-sections “Factors to Consider When Choosing Height” and “Tips for Getting the Right Height”. Follow our simple guidelines for perfectly-hung artwork in your home or office.
Factors to Consider When Choosing Height
When hanging pictures, many factors should be considered. Room purpose, image size, and furniture arrangement all play a role.
- Room Purpose: Hang it at eye level if it’s in a seating room.
- Picture Size: Larger art or multiple small pics? 6-8 inches above furniture should do the trick!
- Furniture Arrangement: Space between furniture and art is key for a comfy continuity.
For busy rooms or with kids, hang higher to avoid any harm. Don’t miss out on floor-to-ceiling sightlines – follow our tips to get it just right – no need to take a gamble like Russian roulette!
Tips for Getting the Right Height
Start at eye level! Hang artwork with its centre at roughly 57″ off the ground.
If hanging above furniture, keep it 6″-12″ higher and not wider than the piece below.
Group pictures together for a cohesive display and balance.
For two-story walls, big art goes on the bottom and small pieces on top.
For mirrored placements, choose an upward angle to avoid disrupting views.
In galleries, artwork is hung higher for better viewing.
Avoid placing photos too high on an abundant wall for a pleasing look.
Measure room dimensions and ceiling height for optimal results.
Choose hooks rated adequately for weight for practicality.
Try the 2 3 rule for composition perfection.
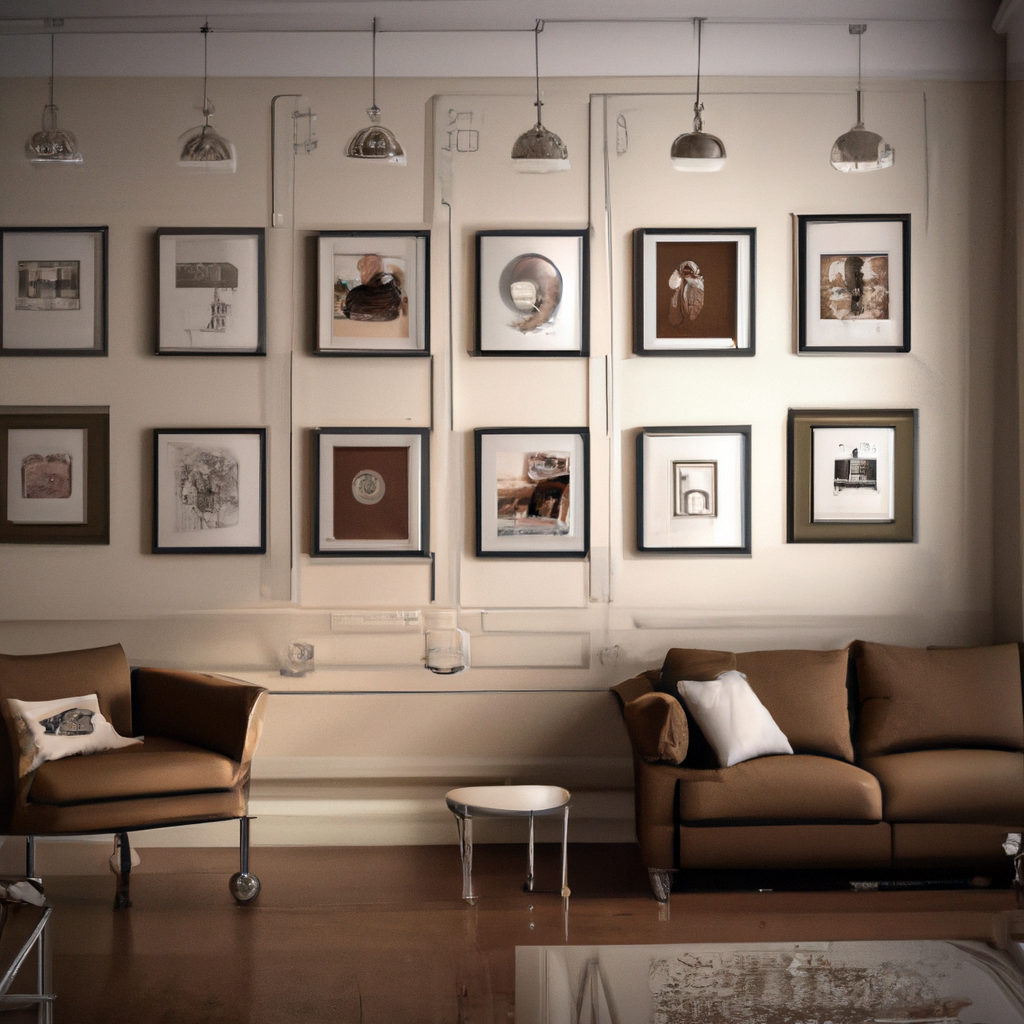
Arranging Pictures Using the 2 3 Rule
To arrange your pictures using the 2 3 rule hanging pictures, you need to consider various elements of the picture and the wall where you want to hang them. In this section, we will explain the process of arranging your pictures using the 2 3 rule, and we will introduce two sub-sections that will provide solutions for arranging pictures in a straight line and arranging them in a cluster.
How to Arrange Pictures in a Straight Line
Unleash Your Inner Creative with the 2 3 Rule!
Struggling with how to arrange your pictures? The “2 3 rule” is here to help! It’s a way to bring balance and symmetry to your wall space, making it look visually appealing. Here are the steps:
- Choose an area with enough room.
- Pick the size, number, and type of frames you want.
- Draw or digitally create your plan.
- Put the biggest frame in the center.
- Position the frames two inches apart horizontally and three inches apart vertically (or vice versa).
- Adjust until you get the perfect finish.
To ensure accuracy, don’t forget to measure each frame before hanging it!
Colors, patterns, and themes can also add unique flair to your arrangement. So put on your creative hat and use this simple yet effective rule to make timeless art!
How to Arrange Pictures in a Cluster
The 2 3 Rule is the key to arranging pictures in tight spaces. Here’s a quick guide:
- Take three similar-sized pics and two smaller ones.
- Hang them close together with equal space between each.
- Place the largest in the center, then the medium-sized ones on either side, and finish with the smallest.
- When above furniture, hang 4-8 inches above the piece.
- Leave at least 2 inches between frames and the wall.
Mixing up frame shapes and textures adds depth. One person tried this and got lots of compliments. It was a great way to coordinate colors without using too much wall space.
Remember: when it comes to pictures, stick to the 2 3 Rule or face a visual disaster!
Alternatives to the 2 3 Rule
To offer alternatives to the 2 3 rule for hanging pictures, this section introduces other picture hanging rules and personal preferences for hanging pictures as a solution. Delve into the sub-sections to learn more about these alternatives and discover which method works best for you based on your goals and preferences.
Other Picture Hanging Rules
When it comes to artwork, the 2 3 rule is a popular method. But, there are other options. The centerline method puts the picture’s center at eye level. Or, create a gallery wall with different sizes and shapes of frames in an attractive pattern.
Picture rails or shelves are unique. You can arrange and rearrange artwork without putting holes in the walls.
If you’re renting, adhesive strips can hold frames without damaging walls. This offers a temporary decor solution.
Don’t be afraid to hang pictures – as long as it’s hanging, it’s art! It’s the personal touch that counts.
Personal Preferences in Hanging Pictures
When it comes to hanging pictures, personal style is key! Here are a few things to consider:
- Placement: Some like symmetry, others go for an asymmetrical look.
- Size & Scale: Choices vary from big to small – depending on the vibe of the room.
- Materials & Colors: Think lighting, texture, trend, culture and more.
Unique details make for the best looks. Try mixing frame styles with similar colors or textures, or use art to create a gallery wall. By understanding how choices affect the look, you can get the exact aesthetic you want. Enjoy the 24/7 Chaos Method!
Conclusion: The Benefits of Using the 2 3 Rule
The 2 3 Rule for Hanging Pictures: A Unique Advantage!
Using the 2 3 rule for hanging pictures has many advantages. Check out these five:
- Balance: Eye-level, two-thirds up from the floor creates a balanced look.
- Any Wall Space: Suitable for high ceilings, low ceilings, long walls or small spaces.
- Save Time: No guesswork or trial and error – just get it right!
- Groupings: Balance and complement each piece of artwork in the display.
- Curb Appeal: Adds dimension and aesthetic appeal to your house facade.
This rule not only boosts visual appeal, but also enhances emotional impact. People feel more relaxed when artwork is placed correctly.
Take advantage of this simple yet effective hanging method! Get an aesthetically pleasing ambiance with the 2 3 rule today!